Getting Started
This page will help you get started with MugenMvvmToolkit. You'll be up and running in a jiffy!
Installation
Under Visual Studio you can use NuGet Package Manager to get MugenMvvmToolkit.
To start developing under iOS, Android, UWP, WinRT or PCL platforms use:
PM> Install-Package MugenMvvmToolkit.StarterPack
To start developing under WPF use:
PM> Install-Package MugenMvvmToolkit.StarterPack.WPF
To start developing under Windows Forms use:
PM> Install-Package MugenMvvmToolkit.StarterPack.WinForms
Hello, World!: Prerequisites
There are exists some prerequisites before you can start developed with MugenMvvm.
- Visual Studio 2015 update 3 with Xamarin for Visual Studio installed.
- Android development: tuned Android emulator. In our examples we use Genymotion.
- iOS development: Mac as build host machine. Please see how to connect from Windows to Mac in Xamarin Docs.
Hello, World!: Xamarin.Android
- Create new Xamarin.Android project (File->New->Project->Visual C#->Android->Blank App (Android)).
- Remove MainActivity.cs file from the project.
- Right click on "References", then "Manage NuGet Packages...", on "Browse" tab in search textbox type "MugenMvvmToolkit.StarterPack" then install it (Click "I accept" if needed).
- Add "ViewModels" folder to Android project.
- Add new class into "ViewModels" and name it "MainViewModel.cs".
- Then open "MainViewModel.cs" and modify it to get code similar to next example:
using MugenMvvmToolkit.ViewModels;

namespace App1.ViewModels
{
  public class MainViewModel : WorkspaceViewModel
  {
    #region Overrides of ViewModelBase

    protected override void OnInitialized()
    {
      base.OnInitialized();
      DisplayName = "Hello, World!";
    }

    #endregion
  }
}
- Open Resources/layout/Main.axml and replace
pkg:Bind="Text Text"withpkg:Bind="Text DisplayName".
<TextView
        android:layout_width="fill_parent"
        android:layout_height="wrap_content"
        android:textSize="50dp"
        pkg:Bind="Text Text" />
- Modify
Setup.csfile. Presented below is an example what you have to get after modifications:
public class Setup : AndroidBootstrapperBase
{
  #region Overrides of AndroidBootstrapperBase

  protected override IIocContainer CreateIocContainer()
  {
    return new AutofacContainer();
  }

  protected override IMvvmApplication CreateApplication()
  {
    return new DefaultApp(typeof(MainViewModel));
  }

  #endregion
}
- Launch the app. As result you will see "Hello, world!" message.
- Congratulations, you successfully developed your first Android application with MugenMvvm.
You can watch video instruction on Youtube: Create "Hello, World" Android application with MugenMvvm
Hello, World! : UWP
- Create new Universal Windows 8.1 project (File->New->Project->Visual C#->Windows->Windows 8->Universal->Blank App (Universal Windows 8.1)).
- Right click on "References" of Windows 8.1 app, then "Manage NuGet Packages...", on "Browse" tab in search textbox type "MugenMvvmToolkit.StarterPack" then install it (Click "I accept" if needed).
- In the same "Browse" tab search textbox type "MugenMvvmToolkit.AutofacContainer" then install it (Click "I accept" if needed).
- Repeat steps 2-3 on Windows Phone 8.1 project.
- Add new PCL project (File->New Project->Visual C#->Windows->Windows 8->Universal->Class library (Portable for iOS, Android and Windows)). Name it as "Core".
- Remove "Class1.cs" file, add new C# class, name it "App.cs".
- Right click on "References" of PCL project, then "Manage NuGet Packages...", on "Browse" tab in search textbox type "MugenMvvmToolkit" then install it.
- In App.cs put the next piece of code:
using System;
using Core.ViewModels;
using MugenMvvmToolkit;

namespace Core
{
  public class App : MvvmApplication
  {
    #region Methods

    public override Type GetStartViewModelType()
    {
      return typeof(MainViewModel);
    }

    #endregion
  }
}
- Add "ViewModels" folder to "Core" project.
- Add C# class "MainViewModel.cs" into this folder. Add there the next code:
using MugenMvvmToolkit.ViewModels;

namespace Core.ViewModels
{
  public class MainViewModel : WorkspaceViewModel
  {
    #region Overrides of ViewModelBase

    protected override void OnInitialized()
    {
      base.OnInitialized();
      DisplayName = "Hello, World!";
    }

    #endregion
  }
}
- Copy content of App.Xaml.cs file (in Windows 8.1 project) and replace the content of App.xaml.cs by it.
- You could delete App.Xaml.cs from Windows 8.1 and Windows Phone 8.1 projects.
- Add reference to
Corelibrary into Windows 8.1 and Windows Phone 8.1 projects. - Find line of code in App.xaml.cs
bootstrapper = new Bootstrapper<Core.App>(rootFrame, new IIocContainer());
and replace it on the next one:
bootstrapper = new Bootstrapper<Core.App>(rootFrame, new AutofacContainer()); - Open MainPage.xaml in Windows 8.1 project and add new
ViewBoxwith binding:
<Grid>
  <Viewbox>
    <TextBlock Text="{Binding Path=DisplayName}" />
  </Viewbox>
</Grid>
You could repeat the same actions with Windows Phone 8.1 MainPage.xaml file.
15. Launch the Windows 8.1 app. As result you will see "Hello, world!" message.
16. Congratulations, you successfully developed your first UWP 8.1 application with MugenMvvm.
You can watch video instruction on Youtube: Create "Hello, World" UWP 8.1 application with MugenMvvm
Hello, World! : Xamarin.Forms.Android
- Create new Blank Xaml App project (File->New->Project->Visual C#->Cross-Platform->Blank Xaml App (Xamarin.Forms Portable)). Name it as "HelloWorld".
- Add new PCL project (File->New Project->Visual C#->Windows->Class library (Portable for iOS, Android and Windows)). Name it as "Core".
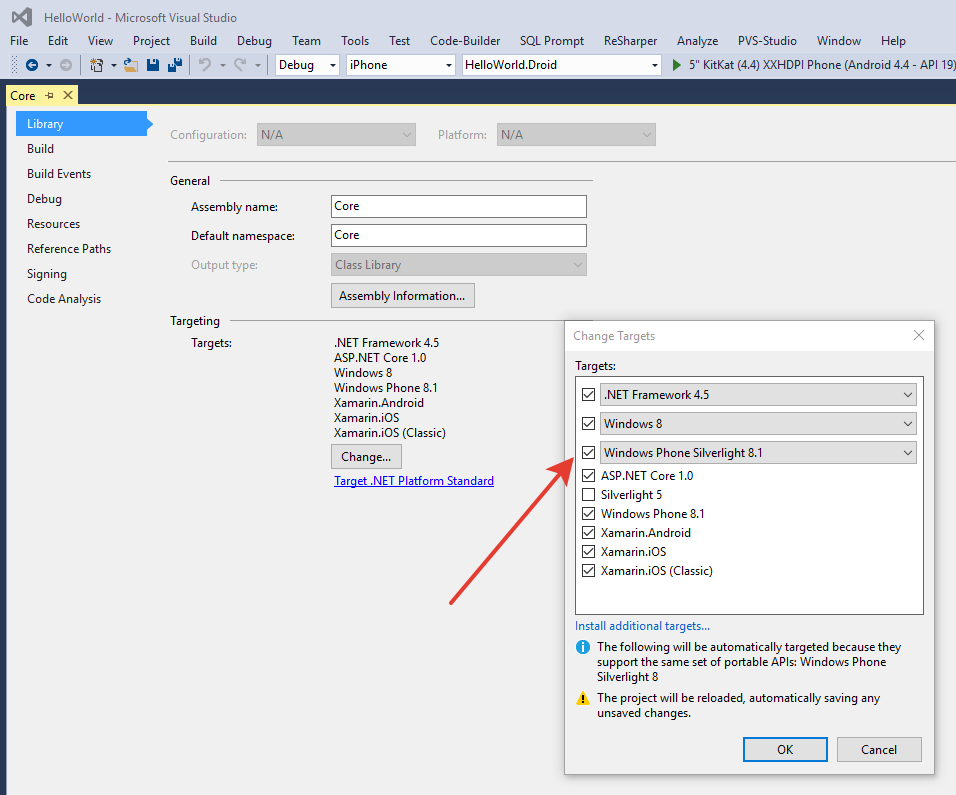
- Open "Core" properties and change project targets by add Windows Phone Silverlight 8.1 targets.

Add Windows Phone Silverlight 8.1 targets.
- Right click on "References" of "Core", then "Manage NuGet Packages...", on "Browse" tab in search textbox type "MugenMvvmToolkit" then install it.
- Remove "Class1.cs" file from "Core" project.
- Add "ViewModels" folder to Android project.
- Add new class into "ViewModels" and name it "MainViewModel.cs".
- Open "MainViewModel.cs" and replace it's content by the next one:
using MugenMvvmToolkit.ViewModels;

namespace Core.ViewModels
{
  public class MainViewModel : WorkspaceViewModel
  {
    #region Overrides of ViewModelBase

    protected override void OnInitialized()
    {
      base.OnInitialized();
      DisplayName = "Hello, World!";
    }

    #endregion
  }
}
- Add "App.cs" class into the root of "Core" project.
- Open "App.cs" and replace it's content by the next one:
using System;
using MugenMvvmToolkit;
using Core.ViewModels;

namespace Core
{
  public class App : MvvmApplication
  {
    #region Methods

    public override Type GetStartViewModelType()
    {
      return typeof(MainViewModel);
    }

    #endregion
  }
}
- Right click on "References" of "HelloWorld (Portable)" project, then "Manage NuGet Packages...", on "Browse" tab in search textbox type "MugenMvvmToolkit.Xamarin.Forms" and install it.
After that, type "MugenMvvmToolkit.AutofacContainer" and install it too. - Right click on "References" of "HelloWorld (Portable)" project, then "Add Reference..." and add the reference on "Core" project.
- Remove file App.xaml and add App.cs file.
- In App.cs replace the code by the next one:
using MugenMvvmToolkit;
using MugenMvvmToolkit.Xamarin.Forms.Infrastructure;
using Xamarin.Forms;
namespace HelloWorld
{
  public class App : Application
  {
    public App(XamarinFormsBootstrapperBase.IPlatformService platformService)
    {
      XamarinFormsBootstrapperBase bootstrapper = XamarinFormsBootstrapperBase.Current ??
        new Bootstrapper<Core.App>(platformService, new AutofacContainer());
      bootstrapper.Start();
    }
  }
}
- Right click on "References" of "HelloWorld.Droid" project, then "Manage NuGet Packages...", on "Browse" tab in search textbox type "MugenMvvmToolkit.Xamarin.Forms" and install it.
- Open "MainActivity.cs" and replace the code by the next one:
using Android.App;
using Android.Content.PM;
using Android.OS;
using MugenMvvmToolkit.Xamarin.Forms.Android;
using Xamarin.Forms;
using Xamarin.Forms.Platform.Android;

namespace HelloWorld.Droid
{
  [Activity(Label = "HelloWorld", Icon = "@drawable/icon", MainLauncher = true, ConfigurationChanges = ConfigChanges.ScreenSize | ConfigChanges.Orientation)]
  public class MainActivity : FormsApplicationActivity
  {
    protected override void OnCreate(Bundle bundle)
    {
      base.OnCreate(bundle);

      Forms.Init(this, bundle);

      LoadApplication(new App(new PlatformBootstrapperService()));
    }
  }
}
- In "HelloWorld (Portable)" rename "MainPage.xaml" to "MainView.xaml". This action allows to
MainViewModelfind the appropriate view. - Open MainView.xaml and replace it's content by the next code:
<?xml version="1.0" encoding="utf-8" ?>
<ContentPage xmlns="http://xamarin.com/schemas/2014/forms"
             xmlns:x="http://schemas.microsoft.com/winfx/2009/xaml"
             x:Class="HelloWorld.MainPage">

  <Label Text="{Binding DisplayName}"
           VerticalOptions="Center"
           HorizontalOptions="Center" />

</ContentPage>
As you can see, we add binding to Label.Text property on DisplayName property of viewmodel.
18. Launch the app. As result you will see the "Hello, world!" message.
19. Congratulations, you successfully developed your first Xamarin.Forms.Android application with MugenMvvm.
You can watch video instruction on Youtube: Create "Hello, World" Xamarin.Forms Android application with MugenMvvm
Hello, World! : Xamarin.iOS
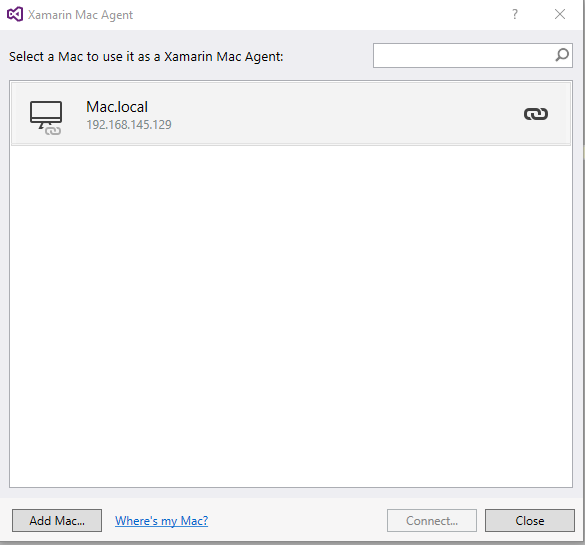
- Please be sure that you have Mac to use it as a Xamarin Mac Agent. In our example we are using a virtual machine with Mac OS.

Xamarin Mac Agent is correctly set
For more information please refer to Xamarin iOS Getting Started Docs.
- Create new Xamarin.iOS project (File->New->Project->Visual C#->iOS->iPhone->Blank App (iPhone)). Name it as "HelloWorld".
- Add new PCL project (File->New Project->Visual C#->Windows->Class library (Portable for iOS, Android and Windows)). Name it as "Core".
- Right click on "References", then "Manage NuGet Packages...", on "Browse" tab in search textbox type "MugenMvvmToolkit" then install it.
- Add "ViewModels" folder to Android project.
- Add new class into "ViewModels" and name it "MainViewModel.cs". Add there the next code:
using MugenMvvmToolkit.ViewModels;

namespace Core.ViewModels
{
  public class MainViewModel : WorkspaceViewModel
  {
    #region Overrides of ViewModelBase

    protected override void OnInitialized()
    {
      base.OnInitialized();
      DisplayName = "Hello, World!";
    }

    #endregion
  }
}
- Remove "Class1.cs" file, add new C# class, name it "App.cs". In "App.cs" put the next piece of code:
using System;
using Core.ViewModels;
using MugenMvvmToolkit;

namespace Core
{
  public class App : MvvmApplication
  {
    #region Methods

    public override Type GetStartViewModelType()
    {
      return typeof(MainViewModel);
    }

    #endregion
  }
}
- Right click on "References" of "HelloWorld" project, then "Add Reference..." and add the reference on "Core" project.
- Right click on "References", then "Manage NuGet Packages...", on "Browse" tab in search textbox type "MugenMvvmToolkit.StarterPack" then install it (Click "I accept" if needed).
If "File Conflict" window would appear, click "Yes to All". - Open Views/MainView.cs and change the next lines:
using (var set = new BindingSet<MainViewModel>())
{
  set.Bind(label, () => l => l.Text).To(() => (vm, ctx) => vm.Text);
}
to these ones:
using (var set = new BindingSet<MainViewModel>())
{
  set.Bind(label, () => l => l.Text).To(() => (vm, ctx) => vm.DisplayName);
}
So, here we binded Text property of Label to DisplayName property of MainViewModel.
10. Select "iPhoneSimulator" in "Run" panel of Visual Studio:

Choose "iPhoneSimulator"...
- Launch the app. As result you will see the "Hello, world!" message in iPhone Simulator.
- Congratulations, you successfully developed your first Xamarin.iOS application with MugenMvvm.
You can watch video instruction on Youtube: Create "Hello, World" Xamarin.Forms Android application with MugenMvvm
Updated less than a minute ago
